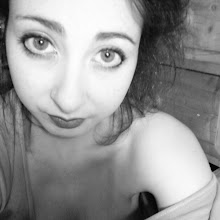
This post is going to be a quick makeup tutorial on the look above, which is a neutral smokey eye.. I primed my eyes with Urban Decay's primer potion beforehand, although don't worry if you don't have any/don't use it.. I don't usually prime my eyes & personally it doesn't make too much difference, although I do use eye-moisturisers reguarly to keep my eyelids & under eyes smooth :)
Ps. I used the Naked Palette, but if you don't have this don't worry- just find colours similar, or you could even use the same techniques/method, with a completely different range of colours.. try and keep to a colour scheme though... like, a range of different purples (for example ..hahaha) ..enjoy!! (I am also going to apologise now for the lighting in some of the pictures...The colours of the eyeshadows we're being properly picked up, but I'm sure you'll get the idea!)
Firstly, I took 'Sidecar' (a light brown with sparkles) and applied this all this all over my lids, right up to my brow bone, using a small fluffy shading brush. I particularly made sure to bring it right into the inner corner of my eye.
Secondly, I took 'Smog' (a darker/chestnutty shade of brown, which also has sparkles in) and using the same brush as before I applied this to my outer third/half...I also took this one right up to my brow bone, following the line I had made when applying 'Sidecar'.
Then I took 'Darkhorse' (a shimmery dark brown) and using a small, flat & fairly dense shading brush, applied this to the outer third of my crease, and then brought it down to the outer half of my lower lash line (using eye shadow to do this frames your eye in a gentler way, which I find looks better when you have a lot going on with the rest of your eye makeup- it creates a balance).
Next I took a big fluffy blending brush and a small smudging brush and got rid of the harsh lines of the eyeshadow, firstly taking the smudger brush and going around the outline of the eye shadow in small buffing-circular motions, & then taking the big fluffy brush and doing gentler circles around the edges to create a gentle transition from the skin into the eyeshadow. I also made sure the smudge the eyeshadow on my lower lash line.
After that, I took 'Half Baked' (a golden-yellowy colour) and applied it to my inner corner, and across the inner third of my lower lash line using a fairly stiff, flat brush.. this brightens up your eyes (the same as a white eyeshadow would do), however this golden colour compliments the rest of the eye makeup much better.
I then took my Rimmel Gel Liner in Black and applied a thin line across my upper lash line.. I personally feel more comfortable with some eyeliner on, as I feel it makes my eyes look wider & more awake. I find it also brings out the colour in my eyes more, but this isn't completely necessary..
Finally, I did my mascara (which also makes your eyes look wider!) I applied a couple of coats to my upper lashes, and a gentle coating to my lower lashes- I'm not a huge fan of lots of mascara on lower lashes, however I feel a small amount does look better than none. (I also apologise for the state of my mascara... hahah)
There you have it! My neutral smokey eye. As I don't ever tend to do much with my hair I tend to put more effort into my makeup, so would maybe wear this to college/shopping (although may not use darkhorse in the crease as that definitely intensifies the look) with a darkish-nude lipstick [today I'm wearing Rimmel's 'Spice' Pencil with Revlon's 'Mink'), but I would definitely wear this look on a night out, and to make it more dressy would probably go for a brighter lip (probably a bright or vampy red).
I hope you found this tutorial helpful, and let me know if you have any requests! :)


No comments:
Post a Comment